When I made my new pizza crust recipe, I decided to bake half the dough in a loaf pan just for kicks. It turned out a bit too gummy, since it contains a lot of starch, but Bill cut a slice and toasted it, and told me it would make a pretty great english muffin. Thanks to Bill’s suggestion, I made it my mission to make English muffins!
This recipe took me several tries to get the texture right once they are baked. For grain-free breads to turn out well, you need a good bit of starch, because almond and coconut flour can be so dense, but too much starch makes things gummy, so that wont work either.
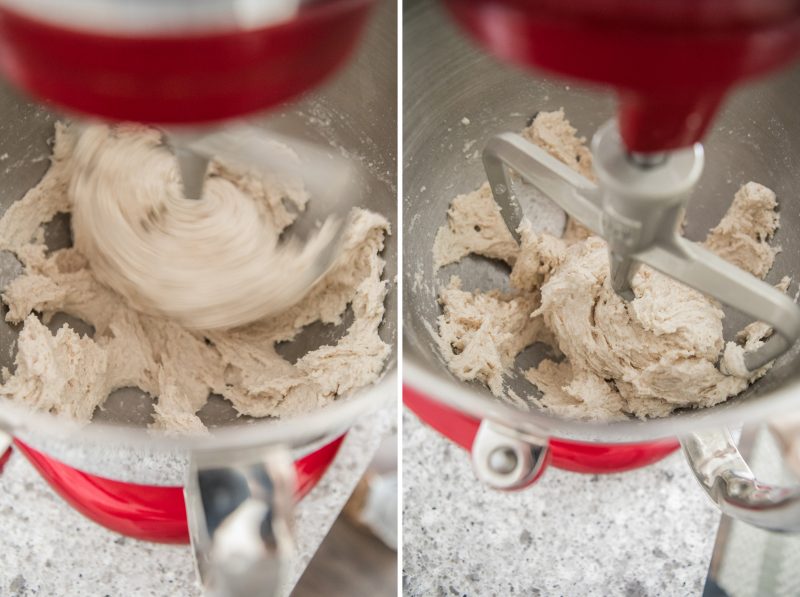
Similar to the pizza, this recipe calls for rapid rise yeast, as well as baking powder. I think this is a combo I will stick with when making breads, because it really makes a difference in how much the dough rises. It’s so crazy to see!
This dough is very sticky, and you need it to be that way for the English muffins to turn out properly. You want them to be light, not solid pucks of dense grain-free dough. With that being said, it takes some patience to work with this dough when its raw. Once you get it formed into pucks, it’s much easier to handle when you cook it in the skillet or on a griddle, but getting it rolled into balls and then formed into pucks is tricky.
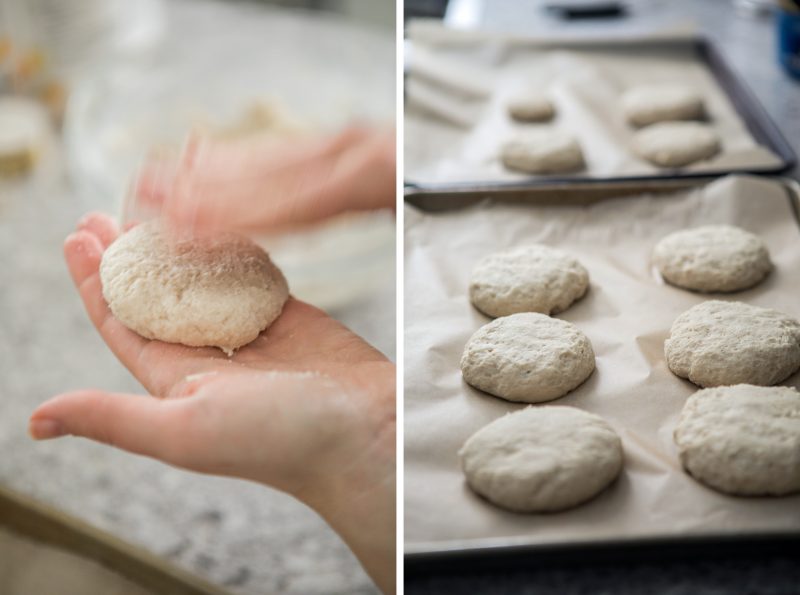
What I have found to work, is working with the dough quickly. It also helps to be sure that you have clean hands. I will rinse my hands as needed, because once you have a lot of dough on your palms, it will keep sticking to that dough. I grab about a palm full of dough, and with very little pressure, I roll the dough into a ball with my palms, working quickly. I will pat it down into a puck shape, and place it on a parchment lined baking sheet.
This dough will continue to rise once it’s formed into pucks. You can cover it with a towel, and allow the muffins to rise once formed for 30 more minutes, but it’s not that necessary. I typically just start cooking them once they are all formed. I start cooking the first ones I formed, and I figure by the time I’m through they’ve all risen more just in the time it takes for me to get through forming them and then cooking them on the stove top. Did that make sense? I feel like it sounded better in my head.
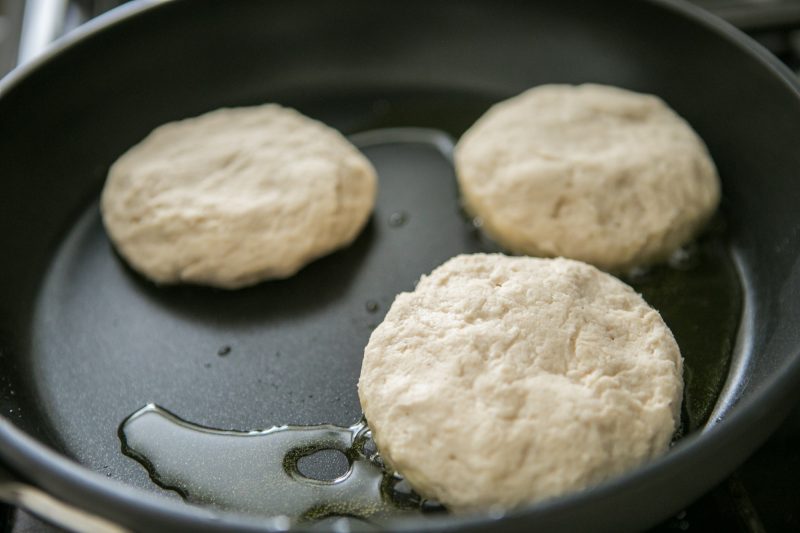
I actually think cooking these beauties is the easiest part of making them. We’ve been loving our new All Clad non-stick skillet lately, and it worked beautifully for these! I add plenty of ghee to the skillet, and warm it over medium heat. Once the skillet is hot, I add 3 muffins at a time, and allow them to cook for 5 minutes a side. They will flip easily, and just add more ghee if needed. You may need to play around with the temperature of the skillet. If it heats up too much, just turn it down a smidge, and if it doesn’t seem hot enough after you turn it down, then just turn it back up. Babysitting the heat of the skillet is really the only thing you need to worry about.
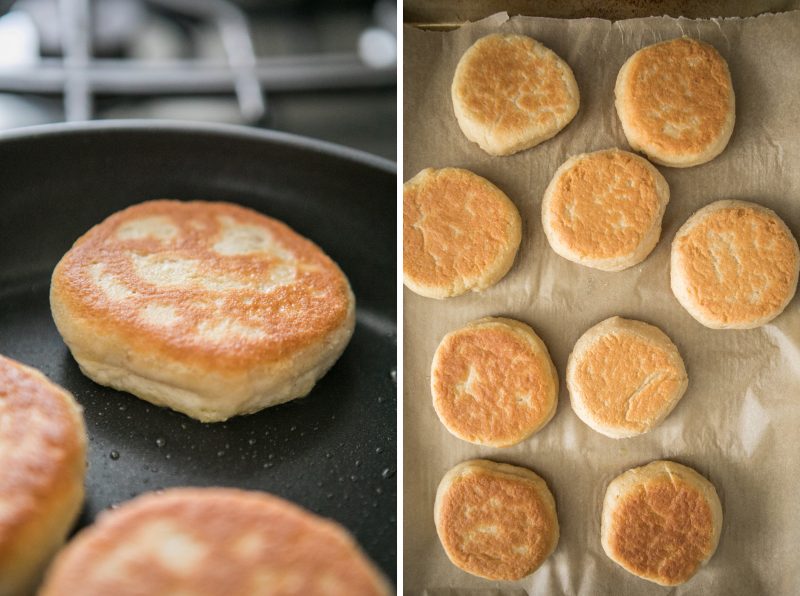
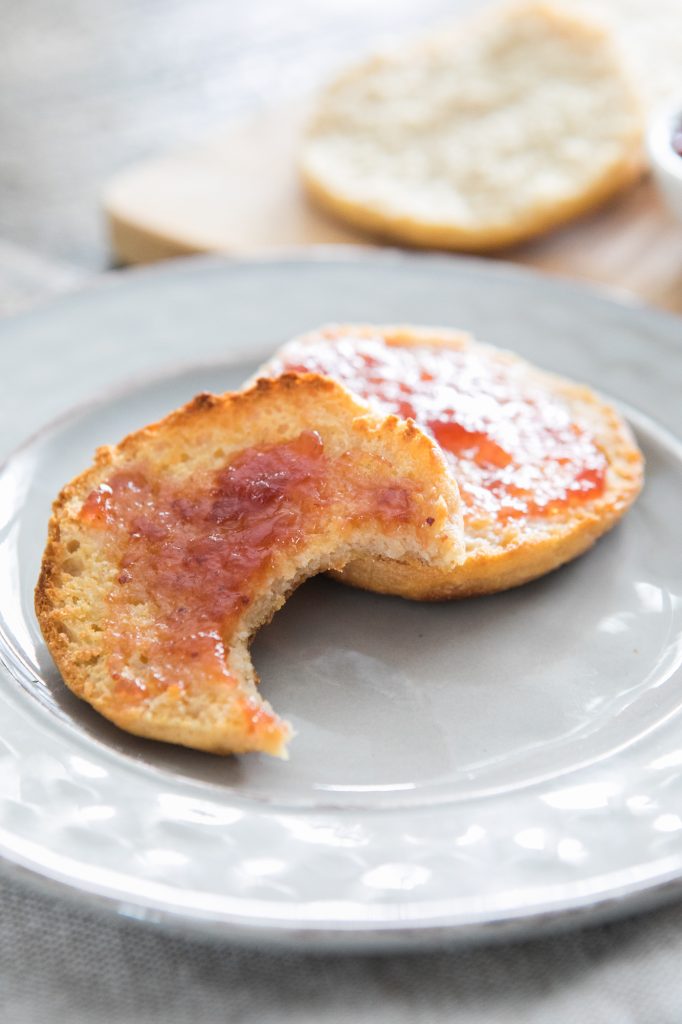
Once you have cooked the muffins on the stovetop, place them in the oven to bake at 350 for 20 minutes. Once they are done baking, and the smell of yeasted, buttery english muffins fills your home, this is the truly difficult part of this recipe. You HAVE TO let them cool for at least 1 hour. If you do not do this, they will seem gummy in the center. They are even better the following day. I allow them to sit at room temperature in a sealed container over night, and the next morning they are perfect! After that I refrigerate or freeze them.
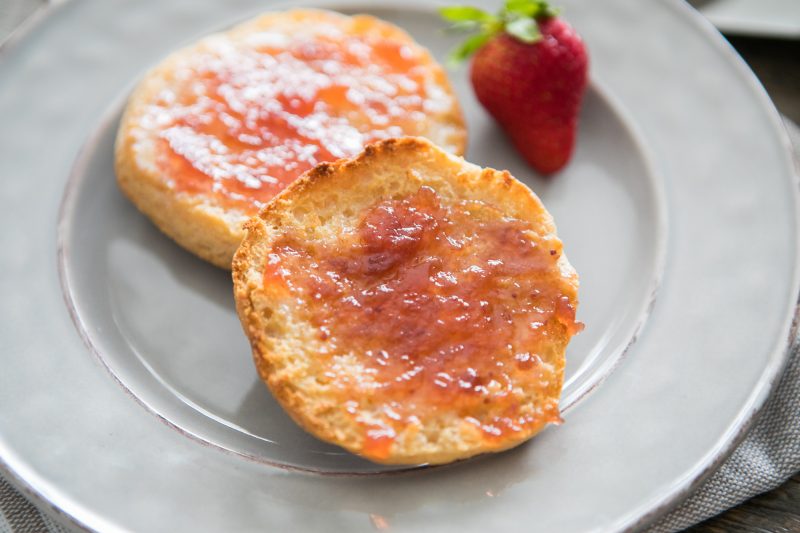
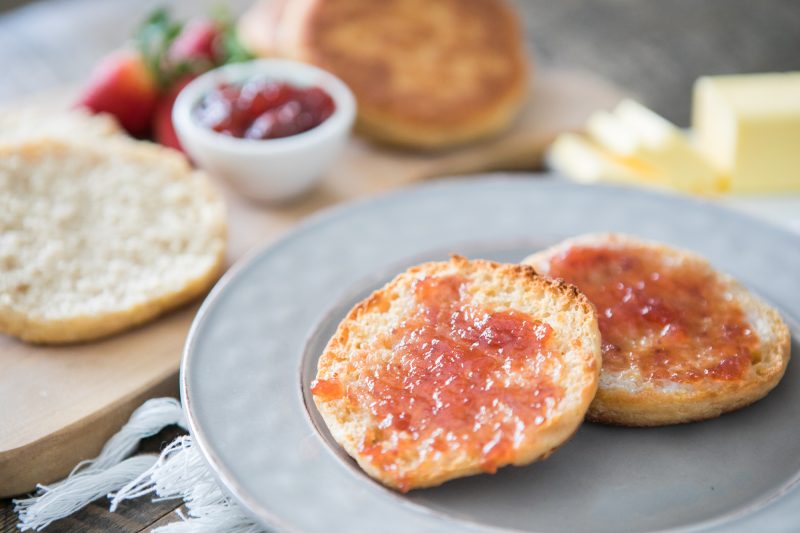
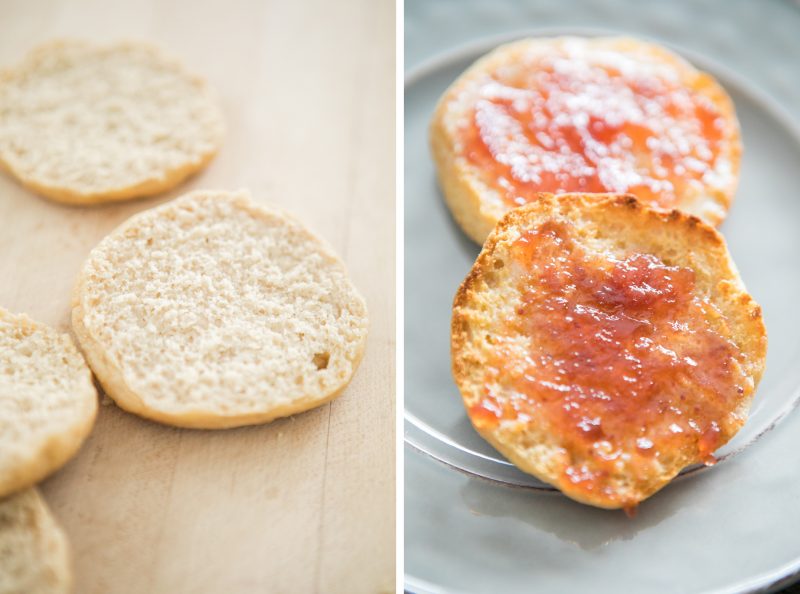
To open them up, you just use the classic method of using a fork. From there you can toast them, smother them with ghee or butter, and jam, or make a breakfast sandwich, or Eggs Benedict (I have a recipe for that coming soon!)
These English muffins take quite a bit of time, but they are fun to make, and even more fun to eat! I hope you enjoy them as much as we have!
-Hayley
Grain-Free English Muffins

Serves: 9
Serves: 9Ingredients
- 1 1/2 cups 1 1/2 cups 1 1/2 cups Cassava Flour, sifted, plus 1/2-3/4 cup for dusting, sifted as well

- 1 cup 1 cup 1 cup Blanched Almond Flour
- 1/4 cup 1/4 cup 1/4 cup Potato Starch
- 1/4 cup 1/4 cup 1/4 cup Tapioca Starch
- 1 1/2 Tbsp 1 1/2 Tbsp 1 1/2 Tbsp ground Psyllium husk
- 1 tsp 1 tsp 1 tsp Himalayan Pink Salt
- 2 1/2 tsp 2 1/2 tsp 2 1/2 tsp Baking Powder
- 2 1/4 tsp 2 1/4 tsp 2 1/4 tsp Active Dry Yeast, Rapid Rise
- 1 cup 1 cup 1 cup Water, filtered, heated to 100 degrees
- 1 cup 1 cup 1 cup Almond Milk, plain, unsweetened, heated to 100 degrees
- 1 Tbsp 1 Tbsp 1 Tbsp Raw Honey
- 1/4 cup 1/4 cup 1/4 cup Organic [*Spectrum Brand, sustainably sourced] Palm Oil Shortening, melted
- 1 whole 1 whole 1 whole Pastured Eggs, at room temperature
- 2 Tbsp 2 Tbsp 2 Tbsp Ghee, for skillet cooking the muffins
Process
- In the bowl of your standing mixer, combine 1 1/2 cups cassava flour that you have whisked or sifted, 1 cup of almond flour, 1/4 cup potato starch, 1/4 cup tapioca starch, 1 1/2 tablespoons psyllium husk powder, the salt, baking powder, and rapid rise active yeast.
- Turn your mixer on to low speed (with the paddle attachment) to evenly combine your dry ingredients.
- In a small saucepan, warm the water and almond milk until it reaches 100 degrees F.
- With your standing mixer on low speed, slowly add in the warmed water and almond milk.
- Add in the honey, melted palm shortening, and your egg.
- Turn the speed up to medium, and mix until you have a fluffy sticky dough.
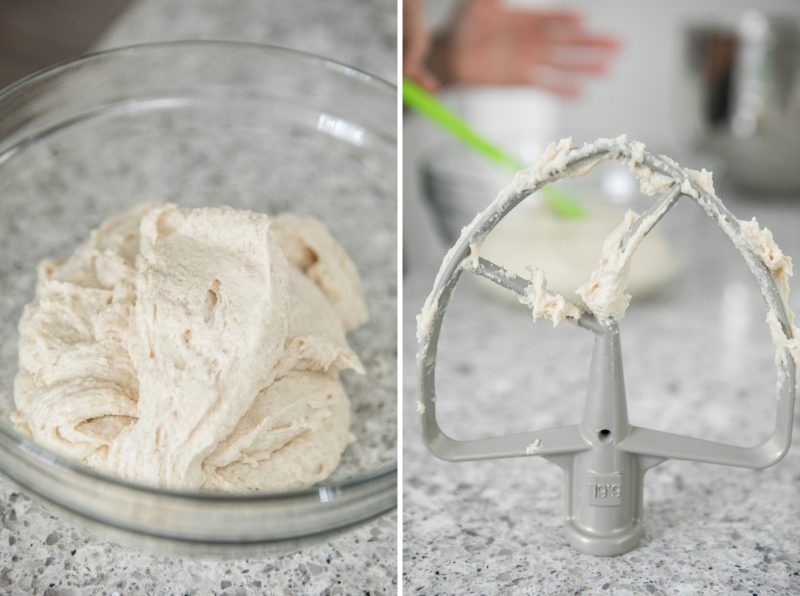
- Pour the dough into a greased bowl, and cover with plastic wrap.
- Set the bowl of dough aside in the warmest part of your kitchen to rise. I usually turn our oven on to 250 F and set the bowl on the cooktop.
- Allow the dough to rise for 1 hour.
- Once the dough has risen, preheat your oven to bake at 350 F, and line two baking sheets with parchment paper.
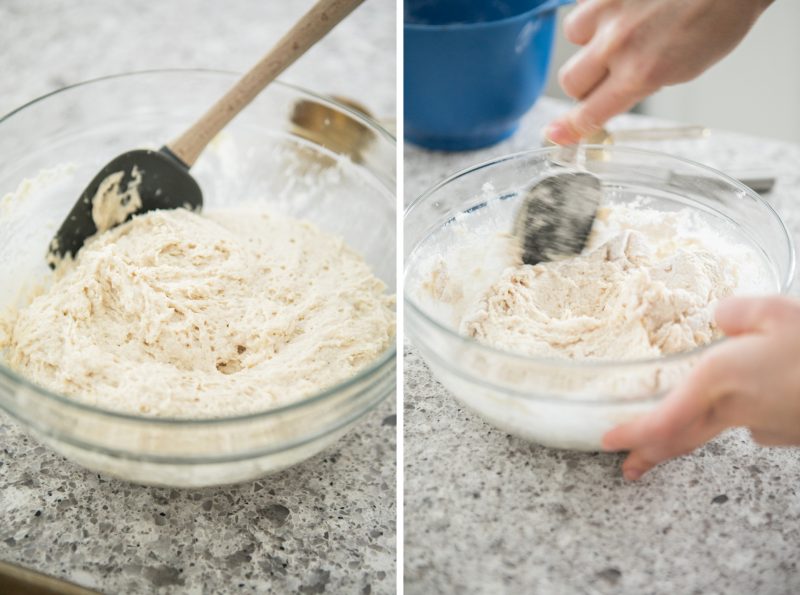
- Using a rubber spatula, fold your dough to release some of the air from rising.
- Sprinkle the dough with 1/2 - 1/3 cups of sifted cassava flour, and continue to fold in the cassava flour.
- This is a very sticky dough, so it will be difficult to work with, but you don't want it to be too sticky that you can roll it into balls with your hands. You also don't want this dough to be too floured, so it's a delicate balance.
- Grab a handful of the dough, and quickly roll it into a ball with the palms of your hands. Using quick movements will help keep this dough from sticking too much to your hands.
- When your hands get too sticky from the dough, rinse them and start again with clean hands, this makes it easier.
- Form balls of dough that are slightly smaller than the palm of your hand. Pat the dough to flatten into a puck shape, and smooth the sides.
- Place the pucks of dough onto a parchment lined baking sheet. Repeat this process until you have 9-10 dough pucks.
- The dough will continue to rise in puck form while you are frying each one.
- In a non stick or well seasoned cast iron skillet, warm 2 teaspoons of ghee over medium heat.
- Once your skillet is hot, place 3 of the pucks of dough onto the skillet. Allow to cook for 5 minutes per side.
- Add more ghee as needed to your skillet in between batches, as well as adding more if needed when you flip them.
- Once you have a batch that has cooked in the skillet on both sides, place them back onto your parchment lined baking sheet, and repeat this process until you have cooked every muffin in the skillet.
- Place the english muffins in your oven to bake for 20 minutes at 350 degrees.
- Remove from the oven, and allow to cool for a minimum of 1 hour.
- Once cooled for 1 hour, use a fork to separate the top and bottom, toast, and enjoy with ghee or butter, jam, or your choice of non-dairy cream cheese style spread.
Notes
These english muffins are even better after sitting at room temperature overnight, just seal them in an airtight container, or gallon ziplock back. You can slice them all, and freeze them as well.


I have an idea. Could a person use a george foreman grill, the flat side and bake these with the lid down? I don’t know if it would turn out or not. Right now I’m doing AIP for awhile, but I can’t wait to try these. They look great!!